|
This app is used for alphalist of employees required under BIR Form 1604C. It is integrated with the Payroll System and can retrieve the needed data from the employee payroll transactions. You can also use it independently, just encode the data manually or use copy/paste if you have excel copy of your alphalist data.
Features:
1. eBIRForm 1604C
2. 2316 - Available in pdf and excel templates (2316v2018 version).
3. Annex F - Ttransmittal list to BIR for employees qualified for substitute filing
4. Dat files generation for eSubmission
5. Alphalist of Employees in Excel format (latest version)
6. Reconciliation of 1601C vs 1604C
7. Proposed 1601C for December based on reconciliation.
8. Tax Due and Tax Refund are automaticaly computed for manual encoding of employee alphalist.
9. Include the signature of the authorized person into the the 2316 template.
The data exported in this app are saved individually including the TIN, Name and Address of the employees. Any changes made on the Payroll Employee master file are not automatically updated here to preserve the actual data exported in the DAT files.
Step-by-step instructions:
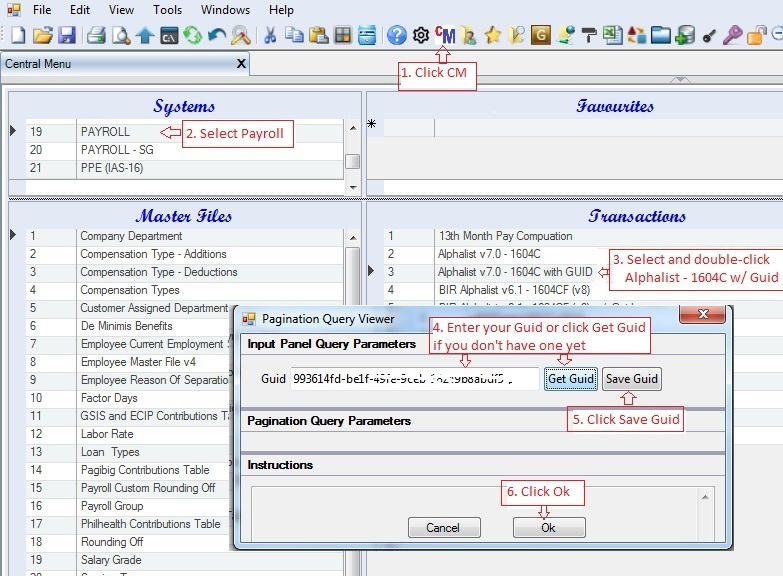
1. Click Cemtral Menu.
2. Select Systems -> Payroll
3. Double-click Transactions -> Alphalist - 1604C with Guid. For users with own database installed, use Transactions -> Alphalist - 1604C and skip instructions 4-6 below.
4. Under Pagination Query Viewer, enter your Guid, if you don't have one, click Get Guid. The Guid is used by the system to filter data.
5. Click Save Guid. It is recommended to copy the generated Guid as you will need it the next time you open this app. DO NOT use the app Alphalist - 1604C (w/o the Guid) unless an exclusive database is setup for you.
6. Click Ok . You will be redirected to Alphalist tab window.

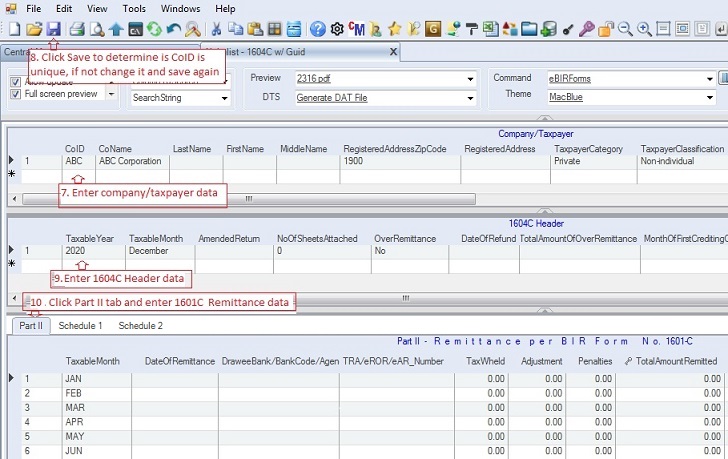
7. Select or enter the company info under the Company/Taxpayer datagrid. The column CoID is alphanumeric and it is used as the primary key. BIR does not allow special characters such as , ' + &*, avoid using these characters when entering data for BIR modules.
8. Click Save, if you added new Company/Taxpayer in #7 above. This is to determine that your CoID is unique, if not, change it and click Save again.
9. Add 1604C Header info. Fill-up all the needed data.
10. Click Part II tab and enter manullay BIR Return 1604C Remittance Info. Fill-up all the necessary columns, this is used in reconciling 1601C and 1604C Alphalist data.
(To automatically generate Part II particularly is you are using the payroll system, select and double-click DTS -> Generate Part II.)

11. Encode payroll alphalist data under the tabs Schedule 1 for above minimum and Schedule 2 for minimum wage earner. The system automatically computes the tax due and tax refurnd.
(To automatically rettrieve alpahalist of employees from the payroll system, click DTS -> Get All Payroll Data)

To print 2316 for each employee:
The 2316 form contains authorized taxpayer signatories, fill up AuthorizedSignatories1 amd AuthorizedSignatories2 under the datagrid Company.
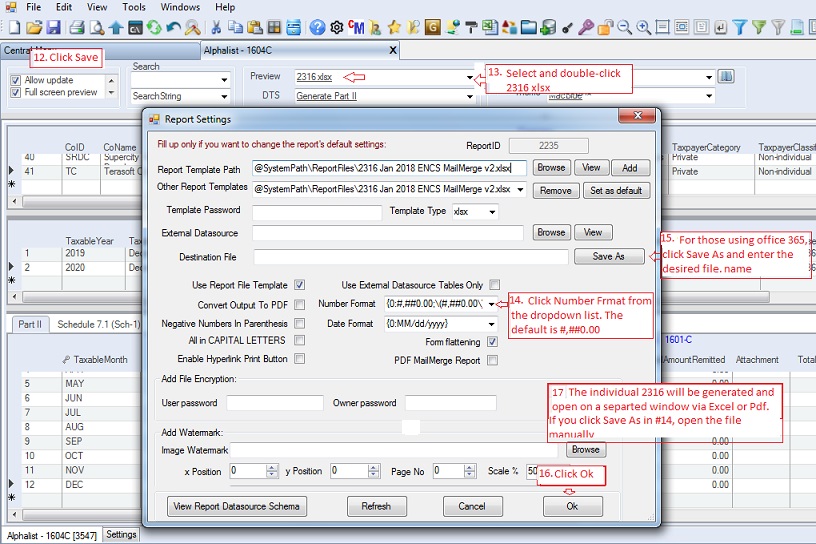
12. Click Save.
13. Click Preview dropdown to show options. Select and double-click Preview -> 2316 pdf or 2316 xlxs. There are two available templates. 1. Excel and 2. Pdf. Select the template that you prefer to use.
14. Click Number Format dropdown to show number formatting options. The default is #,##0.00.
15. For those using Office 365, click Save As and enter the desired file name. The generated individual 2316 will be saved on this file.
16. Click Ok, the 2316 will be generated.
17. The Pdf or Excel apps will be executed showing the generated 2316 file. You can now print and save this file. For Office 365, open the file manually in # 15 above.
If you wish to include the signature of the authorized person to sign the 2316, open and modify the template and include his/her signature before executing instructions 12-16 above.

To print Alphalist of Employees Schedules 1 and 2, follow instructions #13 - #17 above but select Preview -> Alphalist Format 2018 in #13 instead
To print Annex F , follow instructions #13 - #17 above but select Preview -> Annex F in #13 instead
To generate the Alphalist Dat Files for eSubmission:
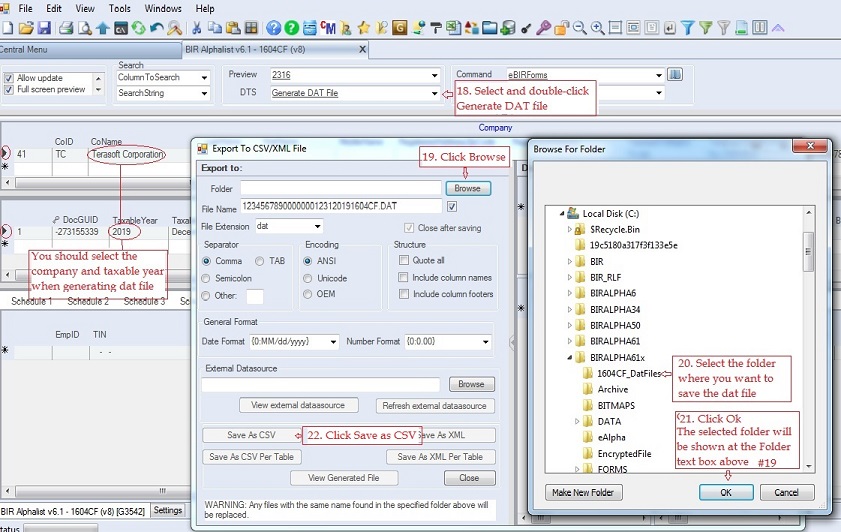
18. Select and double-click DTS -> Generate DAT File. The Export to CSV/XML File pop-up window will appear
19. Click Browse. A Browse For Folder pop-up window will appear.
20. Select the folder where you want to save the dat file (in the sample below, 1604CF-DatFiles folder). You may create your own descriptive folder . During validation and esubmission this is where you will locate the dat files.
21. Click Ok
22. Click Save As CSV.
23. A message will appear if the dat file is successfully completed. Click Ok
You can validate each dat file using BIR validation system. Just select the folder where you saved the dat files in #20 above. Once validated, you can send them via eSubmission.

|