|
This is the year-end alphalist of payees. It can retrieve the data from the QAP module and summarize them. You can also encode the data manually or use copy/paste if you have excel copy of your alphalist data.
Features:
1. BIRForm 1604E
2. Summary List of Payees
3. Dat files generation for eSubmission
4. Retrieve summary list of payees from QAP module.
The data exported in this module are saved individually including the TIN, Name and Address of the employees.
Step-by-step instructions:
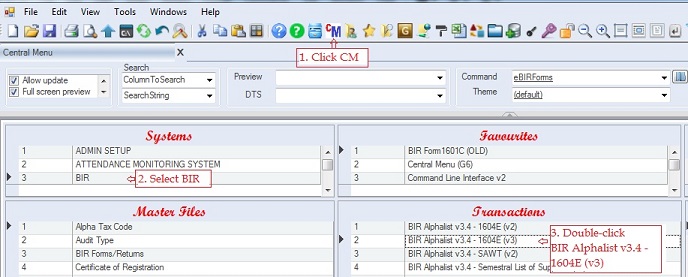
1. Click Cemtral Menu.
2. Select Systems -> BIR
3. Double-click Transactions -> BIR Alphalist v3.4 - 1604E (v3). You will be redirected to Alphalist tab window.
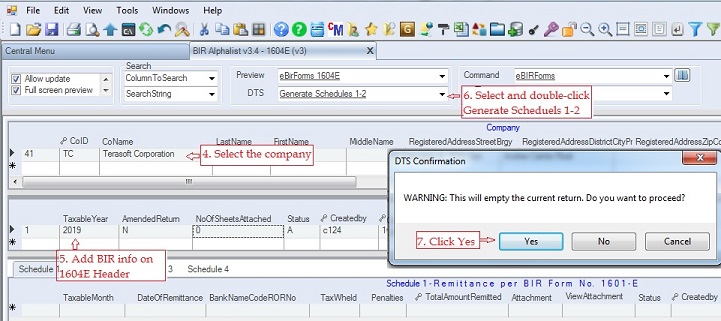
4. Select the company under the Company grid. If the company is not yet encoded, add the company information at the end of the grid. Note: BIR does not allow special characters such as , ' + &*, avoid using these characters when entering data for BIR modules.
5. Add BIR Return Info on the Header. Fill-up all the necessary columns .
To generate Schedules 1-2, do steps 6-7 (Optional only)
6. Select and double-click DTS -> Generate Schedules 1-2.
7. Click Yes to generate the schedules 1-2 based on the 0619E data. Review the generated data in #6. If you are not using the 0619E of QAP module, you can manually encode the data.
To retrieve alpahalist of payees from the QAP module, do steps 8 - 10 and skip 11.
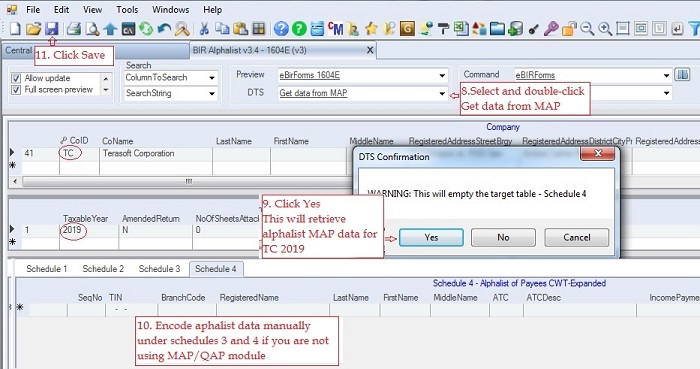
8. Select and double-click DTS -> Get data from MAP/QAP. The Input Panel Query Parameters pop-up windown will appear.
Make sure you selected the right company and return info before doing #8 above.
9. Click Yes
10. If you are not using the MAP/QAP module, encode manually the alphalist in the Schedules 3 and 4. You can use copy/paste if you have excel copy. .
11. Click Save.
To generate the Alphalist Dat Files:
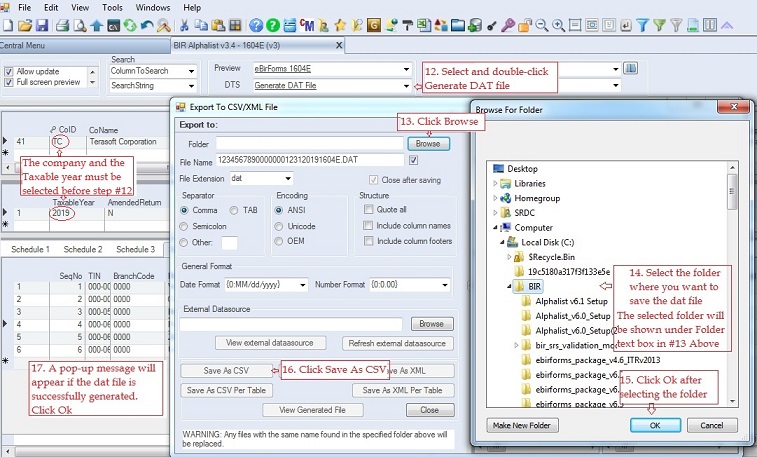
(In this sample the dat file will be generated for the company=TC and taxable year=2019)
12. Select and double-click DTS -> Generate DAT File. The Export to CSV/XML File pop-up window will appear
13. Click Browse. A Browse For Folder pop-up window will appear.
14. Select the folder where you want to save the dat file (in the sample below, 1604CF-DatFiles folder). You may create your own descriptive folder . During validation and esubmission this is where you will locate the dat files.
15. Click Ok
16. Click Save As CSV.
17. Message will appear if the dat file is successfully completed. Click Ok
You can validate each dat file using BIR validation system. Just remember the folder where you saved the dat files in #20 above. Once validated, you can send them via eSubmission.
|