|
The Books of Accounts master file contains the books of original entry. The system is shipped with pre-defined books of accounts. You can add or delete the books based on your company requirements. If you are required to maintain separate books for the branch, you can create books for each branch but you have to update first the Branch master file.
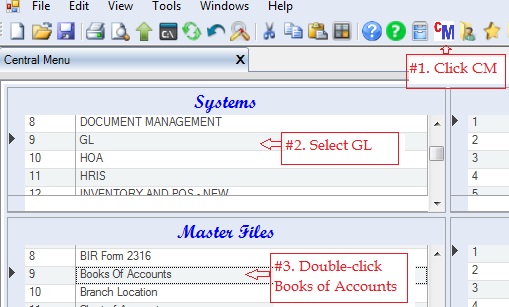
Step-by-step instructions:
1. Click Cenral Menu. Your Central Menu maybe different from the screenshot below as each user can have different menu and access rights.
2. Select System->GL
3. Double-click Master Files -> Books Of Accounts You will be redirected to Books of Accounts tab window.
4. Click DTS->GenerateBooksOfAccounts. This will generate the default books of accounts.
5. Add or delete based on your company requirements. The following columns must be filled up properly.
•CoID. This is automatically filled-up by the system.
•DocType refers to the document type. This is usually printed as part of the document number. Ex: CV-00001 = CV is the doctype and 00001 is the document number of DocNo.
•DocDesc refers to the description of the book. Ex: Check Voucher
•BookTypeID refers to the type of books. Ex: CV. This BookTypeID can have one or more DocType.
•BookName referst to the name of the book. Ex: Check Disbursement Book
•Part of GL. Check this if the books is part of the GL books of accounts.
•LocationID refers to the location which the document will be used. Ex: Head Office or Davao Branch. The GL system is capable to print books of accounts per location.
•DocModeID refers to the document numbering mode that the system will be used to generate the document number. See Document Numbering Mode for details.
•DocDefinedLength refers to the length of the document number. The system uses 0 padding for uniformity of length. Ex: 00001 for DocDefinedLength = 5. It will be padded with 0.
•Status. A=Active; I=Inactive. Accounts marked Inactive will not be show on the lookup table. So if you want an account not be used anymore in the journal entry, mark it Inactive.
6. Click Save. You can update this file from time to time.

|