|
The Journal Entry contains all the accounting entries recorded in the books of accounts. The system uses the double entry bookeeping system which has two equal and corresponding sides known as debit and credit. Most journal entries can be generated automatically as a relfection carried out from the front-end modules such as entering Sales Invoice, Billing and Collections. You can manually create or modify journal entries if you have the necessary access. For manually encoded entries, the system can automatically generated the journal entries based on the TransactionID proforma entry. See Transaction Proforma Entry for details.
The Journal Entry window composes five grid panels described as follows:
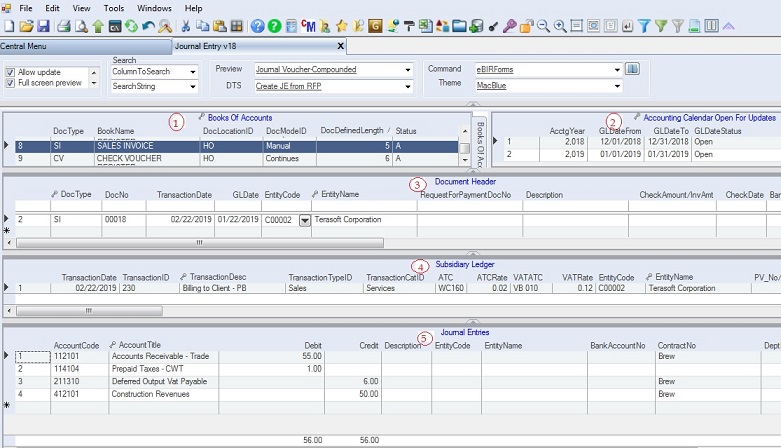
1. Books Of Accounts. This grid shows all the books of accounts of the company. If nothing is shown, update first the Books of Accounts master file.
2. Accounting Calendar/Period Open for Updates. This grid shows the open accounting calendar that allows the user to enter journal entry for a given period. You must open an Accounting Period before you can enter journal entries for that period. If you enter GLDate outside the open accounting period, a red icon error provider will be shown on the cell and you won't be able to save your updates. See Accounting Period master file for details.
3. Document Header. This grid contains the list of recorded accounting documents with general information such as TransactionDate, GLDate, EntityName, Description, etc. Press CTRL+F1 to view the Data Definition.
4. Subsidiary Ledger. This grid is used as working paper to automatically generate journal entries based on TransactionID. The entries here are also used in generating SLSP VAT (2550M/Q) and QAP (1601E/Q) reports. Those entries with TransactionTypeID of Importaion, Purchases and Sales will be marked and exported as VAT transactions and those entries with ATC and WTaxAmount will be marked and exported as Withholding Tax transactions. One record usually has both VAT and WT entries. The Journal Entries have no effect in generating VAT and WT reports as the BIR modules import only data coming from this Subsidiary Ledger. Press CTRL+F1 to view the Data Definition.
5. Journal Entries. This grid shows the actual journal entries pertaining to the currently selected document header. Financial reports such as FS, TB and SL are generated based on these journal entries. Press CTRL+F1 to view the Data Definition.
The DTS (Data Transfer Service) dropdown contains serveral options to automatically generate journal entries. The following are the available options:
1. Create JE from RFP - creates journal entries based on Request For Payment(RFP) encoded under the column RequestForPaymentDocNo on the DocumentHeader.
2. Create JE from SL - creates journal entries based on the grid Subsidiary Ledger. It will follow the proforma entry based on the value of TransactionID.
3. Duplicate Current Entry - creates journal entries based on the currently selected document header's entry. This is useful for copying previous journal entry.
4. Create Closing Entry - creates closing journal entries. All nominal accounts will be closed to RE. You must encode first in the Subsidiary Ledger grid the TransactionID corresponding to closing entry. If no TransactionID is encoded , all nominal accounts will still be closed but to a blank account entry. Update this blank account entry by encoding the AccountCode for RE.
5. Generate Payroll Entry, Generate JE from Contract Billing, Generate JE from Collection and other DTS options are used to automatically generate jounral entries from the integrated front-end systems. Ex: Generate Payroll Entry will generate payroll entries based on Payroll System data.
The Preview dropdown contains print options to print documents or reports. The following options are available:
1. Journal Voucher - Compounded - prints currently selected Journal Entry.
2. Journal Entry w/ Details - prints currently selected Journal Entry including the EntityName on each account.
3. 2307 - prints BIR Form 2307 for the currently selected record..
4. Check Printing - prints check data for the currently selected record.
You must first save your updates before you can print the above documents or reports.
Step-by-step instructions:
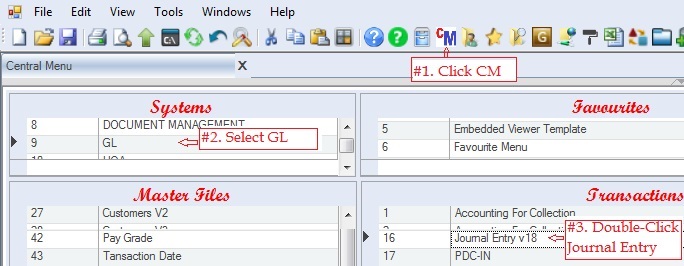
1. Click Cemtral Menu.
2. Select Systems -> GL
3. Double-click Journal Entry v18 (verison 18 is the most recent as of this writing). You will be redirected to Journal Entry tab window.
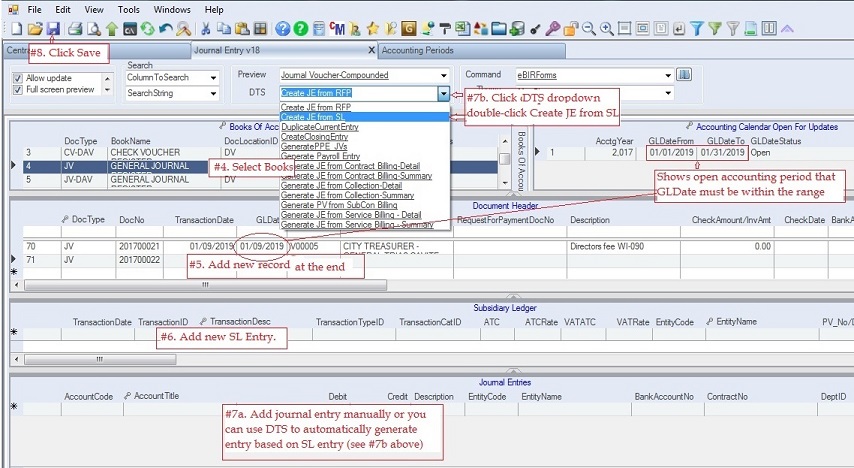
4. Select Books that you want to update
5. Add new record under Document Header. Fill up all necessary columns. The GLDate must be within the Open Accounting Period
6. Add Subsidiary Ledger record. Fill-up TransactionID if you want to automatically generate journal entry based on SL. If there are VAT and WT to be reported you must encode the data on this grid.
7a. Add journal entry manullay or better generated journal entry based on Subsidiary Ledger by following 7b below.
7b. Click DTS dropdown button to show selected options. Double-click Create JE from SL to generate journal entry based on TransactionID on the SL grid. The journal entry will be automatically created and shown on the journal entry grid.
8. Click Save.
To print the journal entry:
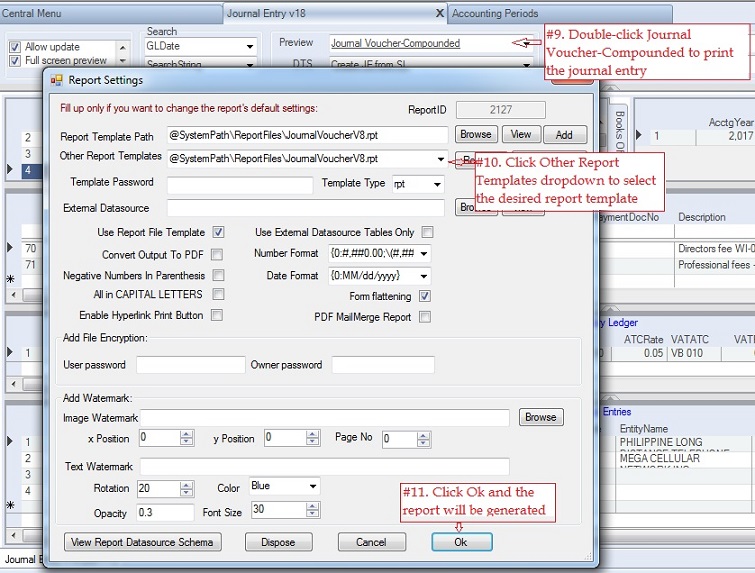
9. Select and double-lick Preview -> Journal Voucher-Compounded to print the journal entry. The Report Setting pop-up window will appear.
10. To change the report template, click Other Report Templates dropdown and select the desired template.
For journal entry printing, there are two available template 1. Crystal Reports and 2. Excel
For check printing, there are 3 available templates: 1. Excel, 2. Word and 3. Pdf. Choose which is suitable to your printer.
11. Click Ok to generate the journal entry report.
Check Printing
For the CV entry, you can also print the check after printing the journal entry. The EntityName, CheckAmount and CheckDate will be used for the currently selected record when printing check.
12. Select and double-click Preview -> Check Printing under instruction #9 then follow instructions 10 and 11 above.
|