|
The Subsidiary Ledger (SL) per Entity is the report to retrieve the SL of each entity or payee/payor. It can serve as SL for accounts receivables, cash advances, downpayment, retention fees, accounts payables and the like.
Below is the Subsidiary Ledger -Entity report schema.
|
Menu ID
|
G2117
|
|
Menu Name
|
Subsidiary Ledger-Entity (FS Face)
|
|
Description
|
Susidiary Ledger per Payee/Payor
|
|
Purpose
|
To print SL per Entity
|
|
Report ID
|
2213
|
|
Template
|
@SystemPath\ReportFiles\SL-Entity.xlsx
|
|
Remarks
|
Can be customized based on your requirements. Click Customize Report for details.
|
The Subsidiary Leger per Entity report template contains the following individual reports:
1. Entity Detail. This shows the all detailed entries, paid and unpaid, per entity
2. Unpaid Only. This shows the detailed entries for unpdate entries only.
3. EntitySum. This report shows summary of balances per entity SL.
4. Account List. This report shows the entries per account.
5. Raw Data. This is a pivot table for all the detailed entries if you wish to create additional report.
Print only the reports that you need.
Step-by-step instructions:
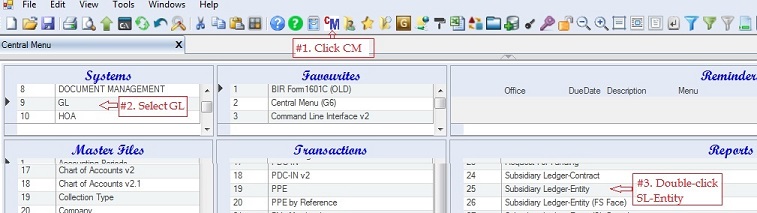
1. Open Cenral Menu. Your Central Menu maybe different from the screenshot below as each user can have different menu and access rights.
2. Select System->GL
3. Double-click Reports -> Subsidiary Ledger-Entity (FS Face) You will be redirected to SL-Entity tab window.
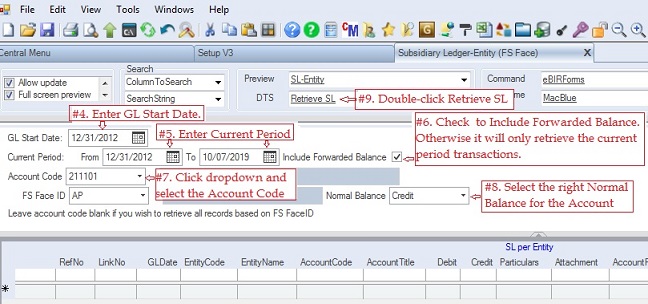
Fill-up report parameters
4.GL Start Date - refers to the start date when the very first beginning balances were entered. To automatically retrieve the right start date, you can update it here.
5. Fill up Period Covered From: To:.
6. Check Include Forwarded Balance. The entries from the GL Start Date up to Period Covered -> From will be lumped into one record marked as Beginning Balance.
7. Click Account Code dropdown to show lookup table. Select from the list account account. In the sample Accounts Payable-Trade is selected. In some instances, if you wish to retrieve SL under multiple accounts, you can leave the Account Code blank and select the FS FACE ID instead. All the entries under it will be retrieved.
8. Select right Normal Balance for the account.
9. Double-click DTS -> Retrieve SL. This time the SL grid will be filled up with all the retrieved records.
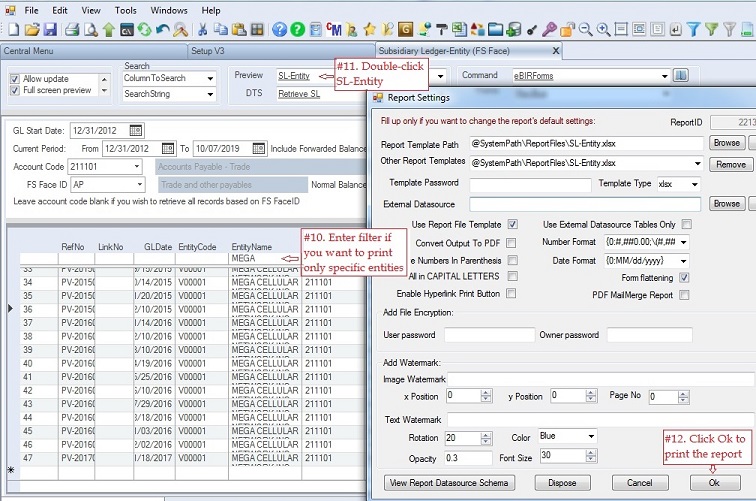
10. Optionally, you may enter filter value to limit the records to be printed. See how to filter data for details.
11. Double-click Preview -> SL-Entity
12. Click Ok to generate the report.
|